 Article
Blood Lactate Monitoring to Improve Endurance Training Effectiveness
By: Scott Johnston
Posted:
This article explains how to effectively use blood lactate testing to control and monitor your training. A lactate monitor is a tool; like any tool, it is only as good as the craftsman who wields it. We start with a bit of history, then move on to just enough physiology so you can understand the role lactate plays in metabolism and why its measurement can be helpful. Next, we’ll do a quick tutorial on how to collect a blood sample. In the final section, we’ll cover a couple of types of lactate tests, their purpose, and how to use them to help your training.
In early studies, lactate, a metabolite (product or component of metabolism), increased in arterial blood and muscle tissue as exercise intensity increased. Therefore, there was a close correlation between lactate production and fatigue levels. That led to the common perception that lactate accumulation was one of the causes of fatigue. Lactate or Lactic Acid is considered a harmful waste product of glycolytic metabolism, which produces some of the energy for exercise. That overly simplistic idea still persists in the minds of many coaches and athletes.
It has been known for over 40 years that lactate is a valuable fuel source for the aerobic metabolic pathway rather than simply being hazardous’ waste.’ So, is lactate a ‘friend’ or a ‘foe’ of the athlete? As with most things in life…..it depends, and the nuance surrounding this very complex process is essential to grasp if you hope to have a working understanding of lactate dynamics.
Athletes and coaches were able to produce fantastic endurance performances long before lactate testing was developed. This article does not mean to imply that you can’t achieve your best results without lactate testing. It is to explain the ins and outs of this procedure and make the concepts accessible to amateur athletes because amateurs are more commonly using lactate meters, and I get a lot of questions about how to use one. This testing can be most helpful for athletes who have a solid aerobic base, are looking to gain a few percentage points in their performance, and are interested in learning how to dial in their training without much guesswork and hit-or-miss trial and error. Lactate testing will not unlock massive performance gains, especially if you have not already spent years developing your aerobic base. Randomly poking a hole in your finger and measuring your blood lactate level is ineffective. There must be a systematic approach if you hope to benefit from this expense.
Lactate that enters the bloodstream from the muscle fibers where it is produced can either be converted to glucose in the liver or enter the mitochondria (with intermediate steps) in other muscle fibers and undergo aerobic metabolism. To paraphrase a famous adage: “One muscle’s garbage is another muscle’s gold.” Moving lactate from where it is being produced in excessive amounts to where it can be used as fuel converts that garbage into gold.
In 1984 physiologist George Brooks and colleagues identified the mechanism whereby lactate is transported from the muscle cells where it is being produced, whose capacity for using lactate as fuel has been reached, to other muscle cells with more capacity to utilize lactate as fuel. This process, called “the lactate shuttle,” was a huge step forward in understanding endurance limitations.
With the advent of relatively cheap hand-held lactate monitors in the early 2000s, lactate testing moved out of the lab and came within reach of coaches and athletes who wanted to use it for field testing.
In the following sections, we’ll discuss why this discovery has significantly impacted endurance training.
Glycolysis is one of the two metabolic processes involved in energy production for endurance activities. If this is a new concept to you, I urge you to become more familiar with the physiology of endurance by reading this article, or for a deeper look; please consult Chapter 2 of Training for the Uphill Athlete. One of the metabolic byproducts (metabolites) of glycolytic metabolism (the breakdown of glycogen for the anaerobic production of ATP) is lactic acid, which immediately dissociates into lactate (the molecule we’ll be focusing on) and hydrogen ions (H+, the acid part, which we will not go into in this discussion).
It is essential to realize that glycolysis, or the anaerobic production of ATP, from the breakdown of glucose is not in and of itself a problem for endurance athletes. It is a boon to endurance if you can utilize a lot of glucose for your exercise. But a problem arises with that pesky byproduct of glycolysis; lactate. When lactate accumulates beyond a certain level in the cytosol of the muscle cell, glycolysis, the metabolic process that is producing more than 50% of the ATP needed to sustain the current level of exercise, begins to slow down. It is like a negative feedback loop: More lactate => Less glycolysis.
When it comes to lactate, there is, metaphorically, a metabolic fork in the road. The fate of the lactate, which fork the lactate takes, perfectly correlates with your endurance. If the lactate takes the fork (the “anaerobic”fork), where it accumulates beyond a critical level, ATP production decreases, and you are forced to slow down.
On the other hand, if the lactate takes the other “aerobic” fork in the road and is thereby prevented from accumulating beyond this critical level, and instead is taken up by the mitochondria or shuttled to other muscle cells where it can be used as fuel, you will be able to sustain a high speed for longer. Since endurance is the ability to maintain a high power output/speed for a long time, encouraging the lactate to take this second fork in the road is highly advantageous to endurance performance and is the goal of proper endurance training.
Correct training methods can increase energy production from the glycolytic system and encourage the lactate to take the “aerobic” fork. It is just as likely, through incorrect training, to discourage the lactate from taking that “aerobic” fork.
The higher athlete’s power or speed, the more prominent role glycolysis in the muscle cells plays in providing the energy for muscle contractions. Slow Twitch (ST) and Fast Twitch (FT) muscle fibers use glycolysis. With their greater aerobic capacity, the ST fibers have an easier time dealing with lactate production. FT fibers, increasingly called into action at higher speeds (near the endurance limit), rely more on glycolysis and do not have such a high aerobic capacity. Thus they see higher levels of lactate accumulation. They need a place to shuttle the lactate. Someplace they can dump their “garbage” where it will be as valuable as “gold.”
The next stage of this process occurs via the “lactate shuttle” mechanism.
The ST fibers can take up and utilize the lactate being produced by the FT fibers. The higher the aerobic capacity of these ST fibers, the more and faster the lactate can be removed from the FT fibers and moved to the ST fibers.
Think of these ST fibers with their high aerobic capacity as a sort of metabolic vacuum cleaner that sucks up that lactate, keeping it from accumulating and thereby allowing you more endurance. If this overly simplistic analogy makes sense, you are beginning to understand endurance. The bigger the vacuum (aerobic capacity), the greater the reservoir for the lactate being produced by the high speeds you are trying to maintain. Acting as a repository for lactate is the role of the aerobic base and why we emphasize its importance so much.
A state exists when sufficient aerobic capacity is available to take up and utilize the lactate being produced. In that state, all or most of the lactate from the anaerobic glycolytic metabolism enters the aerobic metabolism in the mitochondria. This condition is sometimes given the misnomer “aerobic glycolysis .”While it is a misnomer because glycolysis is always an anaerobic process, it is a helpful way of thinking of the fate of the lactate, which enters the aerobic pathway. This is the “aerobic fork” in the metabolic road mentioned earlier.
There’s a simple two-step process to achieve more endurance:
The second step is where a lactate meter can be helpful (although certainly not essential). By training at an intensity where the shuttle mechanism is stressed, you can enhance the shuttle’s capability to move lactate out of the fibers where it is being produced and becoming a problem and into the fibers with a bigger aerobic capacity where it can be used to benefit your endurance. The lactate meter can help you identify the intensity or intensities where this occurs. There is a range and some dispute regarding the best way to produce this result, and we’ll get into that later in the article.
This is not going to be an extensive review of lactate meters. I can only reference the two brands I have used extensively and give my opinion based on my limited experience. I started using a Lactate Pro meter while coaching cross-country skiers in 2000. It was a great tool, and I would be using it today if you could still buy the test strips for it. In what appears to be a marketing decision to upsell users to a more expensive meter, Arkay, the parent company, discontinued the test strips, rendering the Lactate Pro obsolete and replacing it with the much more expensive Lactate Pro2 that uses a much smaller blood sample which is a problem explained later.
As a result, I switched to the Lactate Plus model sold here. A welcome improvement over the Lactate Pro is that the test results can be read in 13 seconds instead of 30 seconds. A quicker reading is helpful because if you get a bad reading (more on that later), you can retest sooner before lactate levels change much. One disadvantage of the Plus is that the sample size (the amount of blood drawn into the test strip) is only 0.7 That is seven ten millionths of a liter That’s a tiny sample size, which can be easily contaminated, spoiling the reading. But it is over twice the size of the sample the new Lactate Pro 2 collects. So it is less likely to become contaminated with sweat or oils on your skin.
You will use a spring-loaded lancet (the same as every type 1 diabetic uses several times a day to measure their blood sugar levels) to poke a tiny hole in the skin so that a small bubble of blood forms on the skin. You’re hoping to hit a capillary so the blood comes out easily without squeezing the skin around the puncture. That’s not as easy as it sounds. You will want to use a 21 gauge lancet because it makes a bigger hole, and it is easier to get a nice blood droplet without squeezing the finger.
The best testing sites are fingers and ear lobes. Fingers for many people are calloused enough to make getting through the callous and hitting the capillary motherload a frustrating challenge. The sides of fingers just off the callous pad usually give better results. I’ve never met anyone with calloused ear lobes, making that site the better choice because ear lobes are heavily vascularized, which gives you a much better chance of getting a nice fat drop of blood forming on the skin. But you can’t draw your sample from your ear.
That’s because once you have a nice 2-3mm spherical droplet of blood formed at the puncture site, you must very carefully dip the end of the test strip (previously inserted into the meter) into the drop. If you miss and touch the skin, you will almost always have contaminated the sample with sweat or skin oil and need to wipe away the blood droplet and let a new one form before touching the strip to it. I recommend approaching the droplet at a 90-degree angle to the skin. You’re correct if this sounds like something that involves a fair bit of fine motor skill. Doing this to your ear lobe, even if you had a mirror, is next to impossible.
The best testing procedure is to puncture the skin with the lancet, then clean the area with a paper towel. A blood droplet will form if you are lucky enough to hit a capillary. Wipe that droplet away because it is probably contaminated, and allow another droplet to form. This is the blood you will test. Bracing my hand against the athlete’s cheek or hand while I collect the sample is the best way to ensure a clean sample. The athlete is likely to be breathing heavily. This process demands good hand/eye coordination between that movement and your slightly shaky hand.
You will want to practice this process and become proficient before you conduct an important test.
In my experience, you will know if you got a good sample from the reading. The meter will give you an error message if it detects a badly contaminated sample. But you may also get a crazy high or low reading. Suppose you are conducting a test to determine a submaximal endurance effort, like an anaerobic threshold test (more on terms coming up), and your athlete is clearly at a submaximal effort. Still, you see a very high reading, like 16mMol/L. In that case, there is a good chance the sample was contaminated. The same thing would happen if you saw a very low reading of, say, 1mMol/L when your athlete had been running hard uphill for 5 minutes.
Plan on wasting at least a dozen test strips in the learning process. As I said in the beginning, this a tool that takes skill to operate well.
Knowing what you want to look for will determine which test you might use. For the following discussion, remember that lactate is a byproduct of glycolytic metabolism. Therefore it can serve as a proxy for both the relative intensity of exercise and the relative balance of aerobic to anaerobic metabolism, which combine to make the total contribution of energy production.
This is probably the oldest and most common lactate test. It is probably the test you will get if you go to a testing facility and ask for a “lactate” test. The test involves you exercising for ‘stages’ lasting 3-4 minutes each, where the intensity is held constant during the stage, and a blood sample is drawn at the end of each stage before the intensity is increased for the next stage. In the end, you will get a graphical representation of your metabolism’s response to increasing exercise intensity. Typically the Y-axis will show the lactate concentration in your blood, and the X-axis will show the intensity, which can be displayed as heart rate, speed, incline, or power (if you are on a bike ergometer). This test is handy for identifying the aerobic threshold (AeT), where lactate accumulates above the baseline level. It is less helpful in determining the anaerobic threshold (AnT) or Maximum Lactate Steady State (MLSS) because you are transitioning through relatively short stages. However, this test does give a good qualitative look at your metabolic response to exercise.
Following are two examples of Lactate Curve tests that represent the best use for this type of test.

Athlete #1
Athlete #2
For this reason, we prefer to test for AnT using a field test like those described near this article’s end or the Maximum Lactate Steady State test.
This is not a test for the dilettante. It is going to take you several tries to find your MLSS. But it is probably the most effective way to use a lactate meter to dial in your training. As you can tell from the two lactate curve tests above, the intensity at which lactate production equals lactate removal is an important metabolic threshold. It represents the maximum pace at which lactate can be maintained at a steady state. Theoretically, this pace could be sustained indefinitely, but in reality, somewhere between 30 and 60 minutes is the limit for this intensity. It is your endurance limit. Above it, the athlete is running on borrowed time.
An athlete’s speed at MLSS or anaerobic threshold best predicts endurance performance. It is a far better predictor than maxVO2. There are many methods for, as well as controversy, surrounding the training to improve endurance. But, before you can even start training at, above, or below this point, you had better know where this point is.
To identify the MLSS intensity. For simplicity, we will use heart rate as our measure of intensity. The commonly accepted test protocol is to select an intensity and begin exercising while holding the intensity constant. If the blood lactate concentration does not rise by more than 1mMol/L between the 10th minute and 30th minute of the test, this is considered the MLSS exercise intensity.
Usually, this will be an iterative test because you will not nail the MLSS in the first, or even the first few, tests. You’ll either undershoot, in which case the lactate levels will decline in those 20 minutes, or you’ll overshoot, and lactate will climb more than 1mMol/L during those 20 minutes. For these reasons, this test is not very popular despite its utility. It takes time, money (test strips), and patience to achieve meaningful results. Because of the intensity of this test, you can’t just repeat it the next day if you didn’t achieve MLSS. Repeat tests must be spread out by a few days, impacting the athlete’s regular training. Depending on how many tests you need to do to find the MLSS intensity, this could take several weeks, during which time the overall training load will need to be kept low to allow for adequate recovery. One way to limit wasted time and energy is to assess the direction of the lactate curve early in the test. If it falls or rises fast after the 15 or 20-minute samples, just halt the test early.
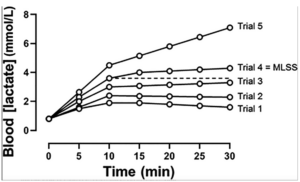 Above is a theoretical MLSS test iteration where the MLSS intensity was established through several tests. Be aware that the actual lactate concentrations, as shown on the Y-axis, will vary from athlete to athlete, depending upon training history. Elite endurance athletes can have MLSS values of 7-9mMol/L, whereas amateurs struggle to hit 4mMol/L. The lactate concentration itself is not essential. What is important is for you to identify your own personal MLSS for that modality of exercise.
If you use this test, it is important to do it in as event specific a modality as possible. This could be done by running around a track where the pace can be controlled. It could be hiking on a stair machine (for the mountaineer or skimo athlete) at a constant speed or hiking or running on a treadmill. Because of the need for holding the intensity constant, this test will not work if done on even slightly variable terrain.
Now you’ve got your MLSS heart rate or running pace, how do you use this information most effectively? More importantly, why not just do an AnT test and skip all these iterative tests? You certainly can. That has been done for decades with good results. However, I promised to discuss ways in which you could dial in the use of a lactate meter, and this is one of the best I know.
Let’s look at an example workout for an elite trail runner.
The workout is 10 x 1km at a 3min/km pace with 2 minutes of recovery between reps. We tested lactates between each 1km repetition. If lactate does not climb, we know that 3min/km is a pace at which he is at a lactate steady state. If lactate levels rise after the later reps, we know the athlete does not yet have the aerobic capacity to handle this pace for an entire 10km.
Before I get hate mail about the best kind of high-intensity training, I must quote again, as I have done in Training for the Uphill Athlete, Per-Olaf Astrand, one of the giants of human exercise physiology from his seminal book, Textbook of Work Physiology, 1970.
“It is an important but unresolved question: Which type of training is most effective for building endurance? 1) To maintain an intensity level representing 90% of the maximum oxygen uptake for 40 minutes. Or 2) To tax 100% of the oxygen uptake capacity for 16 minutes.”
I put this disclaimer here not to dodge the question but to inform the reader that there is, still 53 years later, no consensus on the best method. This is why so many different approaches to high-intensity training are in use successfully. In my experience, the method chosen depends on two main things:
When it comes to appropriate training for FT and ST athletes, I have written extensively about that here.
There are schools of thought that run the full range of Astrand’s two questions. Delving into every one of them is beyond the scope of this article. I’ve tried them all and then some over the past 30 years as both a coach and an athlete. What I am going to share now is not the results of scientific studies.
Counterintuitively, exercise science has no standardization for the terms that describe the two important metabolic thresholds. You would think that having a common language would allow more and easier communication. Instead, over the decades, many terms, some with differing definitions, have been used in the scientific literature. That’s not a huge problem for the exercise scientist who, by the context, can figure out what the term means. Unfortunately, it has led to confusion for coaches and athletes not as well versed in the jargon.
This phenomenon reminds me of the lack of standardization during the industrial revolution, where many screw thread designs were used. Every machine shop or factory felt justified in staking out their little piece of measurement turf and producing their own screw thread design with unique sizes and pitches and often only slightly different from one another. That was no problem inside the factory producing the machine. All the threads were uniform. But once out in the real world, confusion reigned. To the untrained naked eye, one company’s ½ inch screw might look like the next, but it became a nightmare for the repair man. It only took 100-plus years for the world to arrive at some standards for screw threads, so maybe in another few decades, the exercise scientists can put their egos aside and arrive at a consensus.
Until that happens, I have produced below a layperson’s dictionary of terms often encountered when discussing these two thresholds.
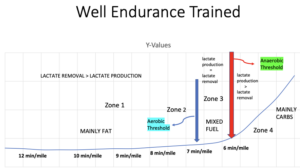
Aerobic Threshold (AeT): The intensity at which the rate of energy production in the muscle cell shifts from a state where aerobic metabolism, taking place inside the mitochondria, produces more than 50% of the ATP to a state where anaerobic glycolysis produces more than 50% of the ATP needed to power the exercise. Because of this shift in metabolism, this is the intensity where blood lactate levels begin to rise above a baseline.
Anaerobic Threshold (AnT) (sometimes, AT): This term initially arose in the mid-20th century when it was thought that it represented a point where there was insufficient oxygen available in the muscle cells to enable aerobic metabolism and the athlete had “gone anaerobic.” Subsequent research has pretty well disproven this “anaerobic” theory. The current view, which seems well established, is that this threshold is crossed when lactate production exceeds lactate removal. We define this as the maximum average intensity that can be sustained between 30 minutes for the less well-trained and 60 minutes for the elite athlete. The name has fallen out of favor in serious scientific literature. Still, it has historical significance because it was the first attempt to define a limit to human endurance that was not based on Hill’s maxVO2 theory from the early 20thcentury. It has remained in casual use because most people know what it means.
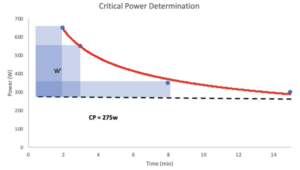
Critical Power or Critical Pace (CP)– With this and the following definition, we are venturing into the “how many angels can dance on the head of pin” realm. CP is the derived pace/power that can be sustained for about an hour. It is determined by doing several time trials of increasing length in which your maximum pace or power for 3 minutes, 8 minutes, and 12 minutes (and if you want another data point, 20 minutes). When plotted on an X-Y (Cartesian- thank you, Rene Descartes) coordinate system, it will describe the shape of a hyperbola whose asymptote is the CP. Translating that to English: Qualitatively, it should be pretty evident that the maximum pace or power one can maintain for longer durations (3, 8, 12, and 20 minutes) time trials will decrease as the duration of the time trial gets longer. You can go a lot harder for 3 minutes than you can for 12 minutes, right? I hope you’re with me so far. It’s reasonable that as the trial gets longer than 30 minutes, the power pace you can maintain will not be much different than the power at 35, 40, 45, or 50 minutes. The CP is the horizontal dashed line in the figure below that the red curve of the hyperbola is approaching (an asymptote from your high school algebra class). That sounds a lot like the definition of AnT or MLSS, doesn’t it? We’re intentionally leaving out a discussion of the blue rectangles labeled W’ for another time as the rabbit hole is getting deep enough. Here is a graphical representation below how Critical Power is determined.
Functional Threshold Power or Pace (FTP)– This is defined as the maximum average pace or power an athlete can sustain for 60 minutes or 95% of the maximum average power or pace sustainable for 20 minutes. From my reading of a lot of literature, the difference between FTP and CP is only in how they are derived. Both CP and FTP are another way of describing the endurance limit of an athlete, just like AnT and MLSS (and, oddly, OBLA).
Onset of Blood Lactate Accumulation (OBLA) – Common sense would lead a careful reader to assume that this is the intensity of exercise where blood lactate levels begin to rise. That intensity would be what we have defined above as the aerobic threshold. That’s what “onset’ means, after all. But no, just like the industrial revolution machine shops, the group that proposed this name contorted the definition of “onset” to mean the intensity where lactate begins to accumulate rapidly. Nutty, huh?
Lactate Threshold (LT)– This is the most commonly used term. Unfortunately, it has two very different definitions. In most scientific literature, it defines the intensity at which lactate begins to accumulate. That’s AeT. Seems appropriate, right? But in nonscientific writing, LT usually indicates the intensity at which lactate begins to rise rapidly or what we have defined as AnT. Nutty, huh?
Maximum Lactate Steady State (MLSS)– Now, we should all be able to get behind this one. It says what it is. The maximum intensity at which blood lactate levels hold steady. This equates to AnT but is determined with the test described above.

 EvokeCast